How to add social login to wordpress? The utilization of a connectivity interface via social networks is becoming more common. It enables the user to quickly and easily register and connect to several sites by memorizing a single username and password. It is popular and useful in conjunction with social media optimization (SMO).
If you are a small business, a blogger, an affiliate marketer managing your wordpress website and several social account or even an e-commerce website with woocommerce, you should keep reading because this article is probably more useful than you think.
Visitors may create an account on your WordPress website using their current social network accounts using social login wordpress plugin. Users can log in with Facebook, Google, or another platform instead of generating a new username or password. This saves customers time, eliminates friction, and ensures that you always have access to their name and email address for future marketing purposes.
In this post, we will demonstrate how to enable social login in your WordPres website and how to add social login icons in your login page.
Why You Have To Add Social Login To WordPress?
There are several reasons why you should enable user registration on your WordPress site. User registration allows buyers to preserve their payment and shipping information if you run an online e-commerce business. This makes future purchases easy for them.
User registration is also a critical component of developing a WordPress membership site or a WordPress online store with woocommerce social login plugin.
However, most users dislike having to fill out lengthy user registration forms while also remembering yet another username and password.
Visitors may create an account on your website using social logins with the press of a button. They can utilize the username and password from their current existing social media accounts, such as Facebook.
Social media login can attract more users to register on your website since it is so convenient. That being stated, let’s look at how you can enable social login option into WordPress with our first plugin.
WordPress Social Login Is A Simple And Effective Plugin.
The first step is to install the WordPress Plugin by clicking on this link. Then we may navigate to the WordPress Installed Plugins then clicking WP Social login settings.
WP Social Login Networks Settings
In this part, we will configure the social networks with which the user can social connect. A new one may be added by “single clicking” on one of the buttons on the “Add additional providers” interface on the right.
Setting up WP Social Login with Facebook as an example
We have three options for each social sharing platform.
- “Enabled“: this list allows you to enable or disable the network connection (if you wish to disable it, remember to save at the bottom of the page).
- “App ID” and “App Secret Key“: these are the identifiers you need to connect your WordPress site to Facebook (or any other social sharing network of your choice).
The following are the many processes to creating a Facebook application (you’ll find further explainations below in this article):
- Navigate to the Facebook Developer website.
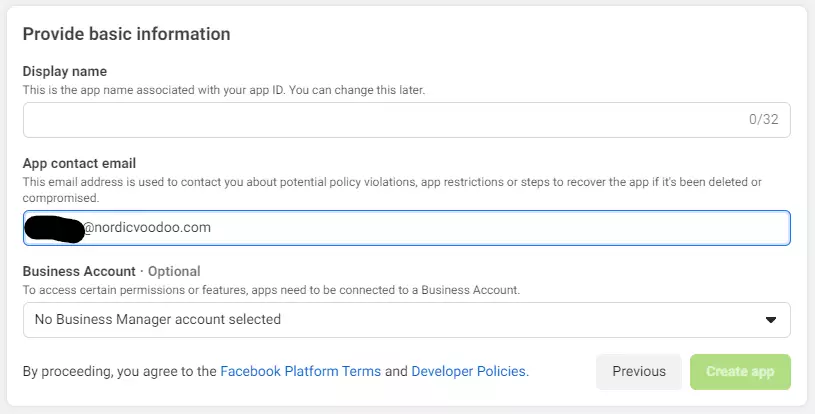
- Add a new app by selecting the Add An App button and choose consumer then filling out the form
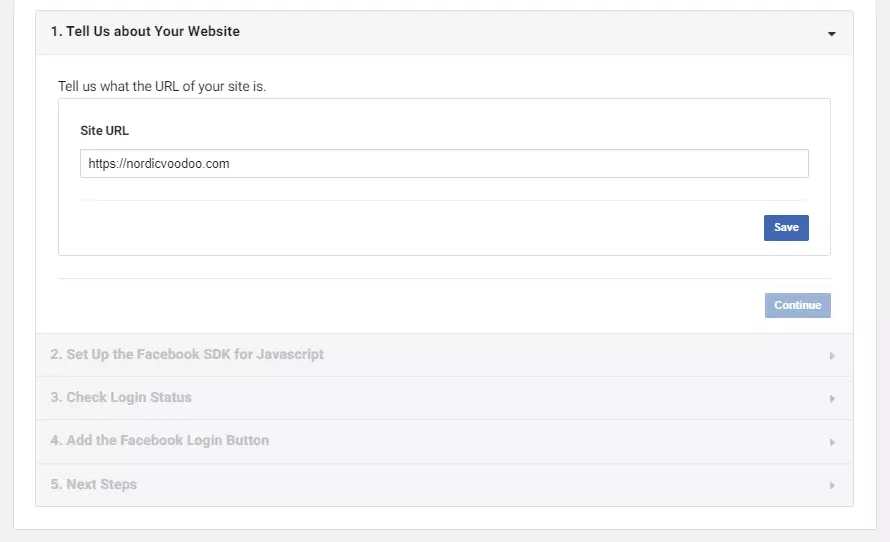
- In your application’s interface, click “Set up” under the Facebook Login Tab then choose “Web” as your platform at the bottom. A new form will show up where you should fill in your “Website URL” area with your website’s address, then click “Save changes” at the bottom right after filling the rest of the form, just follow the instructions.
- Next, go to “App review” and publish your app.
- Now navigate to the “Dashboard.”
From WordPress Social Login, you may extract the “App ID” for the “Application ID” field and the secret key for the “Application Secret” field. Remember to click the Save Changes button at the bottom of the screen.
You may test the connection by visiting to yoursitewordpress/wp-login.
WP Social Login Widget Configuration
In this section, we will customize the widget’s look, redirection, and placement on the sites.
First, here are the Basic settings.
- Fill in the text that will show at the top of your widget here.
- Select the icon style, or leave it blank (will display the name of the network).
- Select if you want the person’s avatar to be the network’s avatar.
Second, here are the advanced options.
- User redirect address if you do not want them to be redirected to their dashboard.
- Change the connection page (Popup: a new page emerges for the connection; In Page: the connection is made without opening a new window).
- Control over how the widget appears on the sites. It is possible to insert it straight into your sites by using the following shortcode:
[wordpress_social_login]
Alternatively by inserting the following code into the PHP of your child theme:
<?php do_action (‘wordpress_social_login’); ?>
- Select whether or not to get notification when adding a new member (only for the site administrator).
Third, you may change the CSS for the widget.
If you want to further personalize your social login buttons, you can add custom CSS code using the WordPress social login plugin, it’s very easy to make your login page and login button appear exactly as you want it to look.
Configuring the WordPress Social Login Plugin Bouncer
- WSL Widget: Controls whether or not the plugin accepts registrations/connections.
- Accounts linking: Allows the user to choose whether to create a new account or tie his social network account with an existing account on the first connection.
- Profile Completion: allows you to request that the user fill his profile information if the social sharing network does not return it to your site.
- User Moderation: Allows registrations to be monitored by a confirmation email or site administrator validation (requires the Theme My Login plugin).
- Member permissions: Allows you to assign new members roles.
- Filters by email domain name: Allows you to set a domain name filter.
- Filters by email addresses: Allows you to apply an e-mail address filter.
So, your WordPress Social Login plugin is now fully configured, and users may login via social login button.
How to Add Social Login To WordPress With NextEnd Social Login Plugin
Nextend Social Login and Registration is a free plugin that allows your users to login to your website using not just Facebook Google and Twitter, but also other social accounts such as Pinterest and LinkedIn. This time, though, we will merely look at how to add a Facebook login option to your website.
How to Install the NextEnd Social Login Plugin
- Navigate to your WordPress dashboard’s Plugins area and select Add New.
- Look up NextEnd Social Login. Install and enable the plugin.
Activate the NextEnd Social Login Features
After installing and activating the plugin, navigate to Settings >> Nextend Social Login on your dashboard.
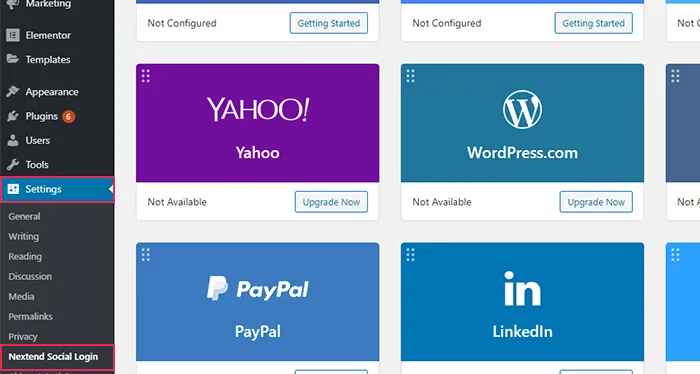
Once there, you must customize your Facebook settings by clicking the Get Started button beneath the Facebook logo.
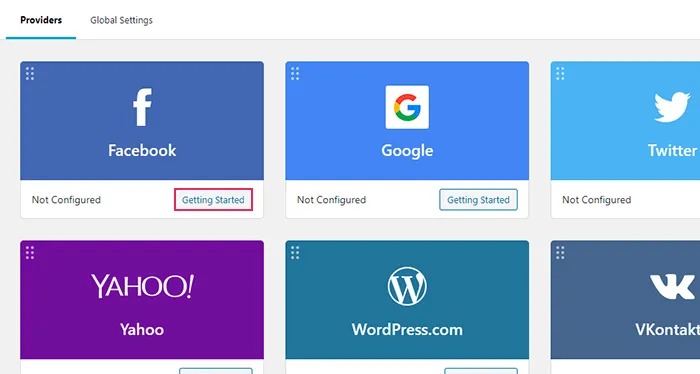
This will now bring up a “Getting Started” screen that will list all of the steps you need to do. The first and most significant step should be to link your plugin to a Facebook app. You should be able to develop an app using the plugin makers’ instructions.
Link Your WordPress Website to Facebook Account
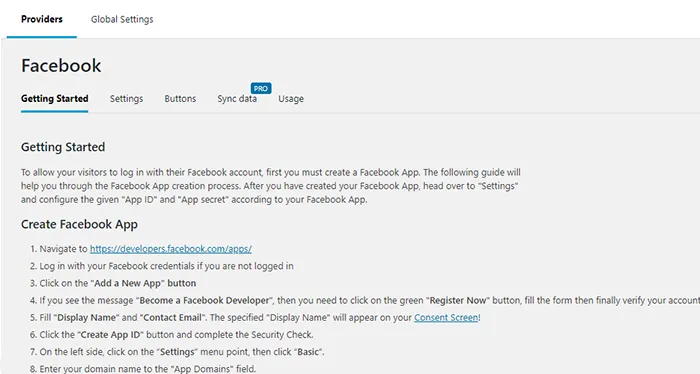
To begin, navigate to the Facebook Developers website and build a new app. If you aren’t already logged in, sign in with your Facebook credentials first, then choose My Apps. If you’ve ever added Facebook comments to your WordPress site, you’ve almost certainly already made a Facebook app for it. In this instance, just copy and paste the existing Facebook App ID and Secret Key into your plugin settings.
Create A New Facebook Social Login App
Simply click the “Add New App” option to start from scratch.
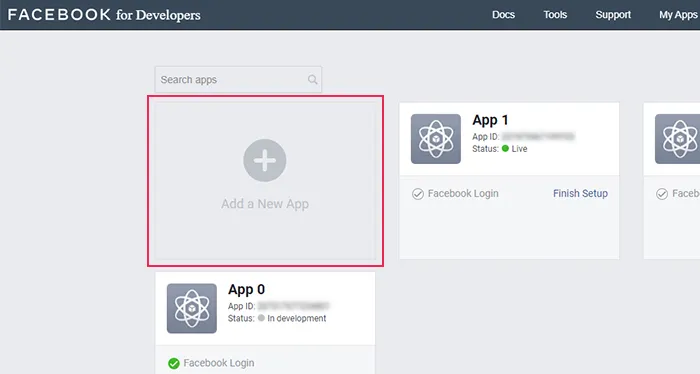
A new pop-up window will open, prompting you to select how you want to use your app. Select the For everything else option.
You must next give the app a display name and provide your email address. When you’re finished, click the Create App ID button.
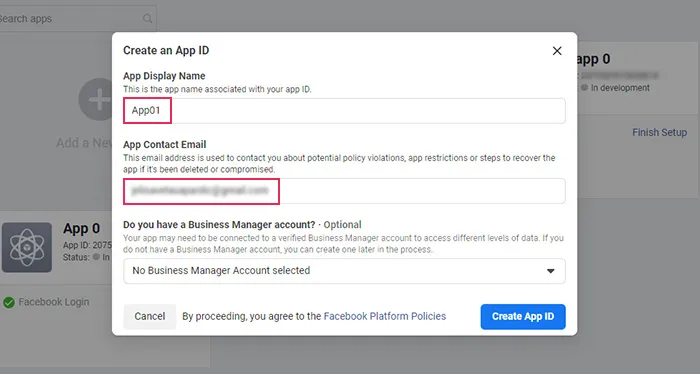
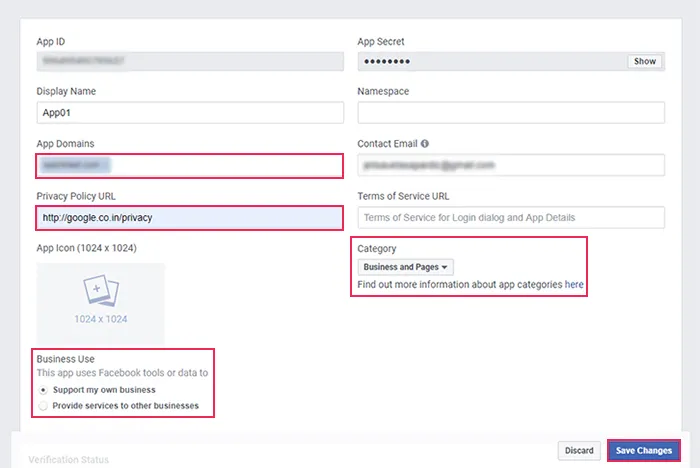
You will be routed to your app’s dashboard after confirming that you are not a robot. Next, navigate to Settings >> Basic.
Enter your domain name in the Application Domains area. Next, enter your privacy policy URL and select your company usage and a category that best fits your needs. Then, press the Save Changes button.
Getting Your Social Login App Credentials.
Now, select Dashboard and scroll down until you find the Facebook ID option. Then, click the Install button.
You will have the option of selecting a platform for your application. To proceed, select the canvas option.
You should then navigate to Facebook Login >> Settings. Add the URL (given in the plugin instructions) to the “Valid OAuth redirect URIs” column and click Save Changes.
It’s now time to switch your app’s status from “In Development” to “Live Mode.” The switch is located in the top bar of the screen.
When you click the switch, you will be prompted to enter live mode. Simply click the Change Mode button, and you’re done.
Connecting Social Media Account With Social Login Plugin
There is just one last thing to do. Go back to Settings >> Basic and copy your App ID and App Secret one at a time.
Return to your plugin panel and manually enter these two codes into the App ID and App Secret sections of the plugin (located in the Settings tab). You’re done when you click the Save Changes button.
From here, you may check your Facebook login settings before pressing the Activate button.
Finally, you may visit your WordPress login page to see how your social login button works.
How to Use Super Socializer to Add a Social Login to WordPress
How to Install the Super Socializer Plugin
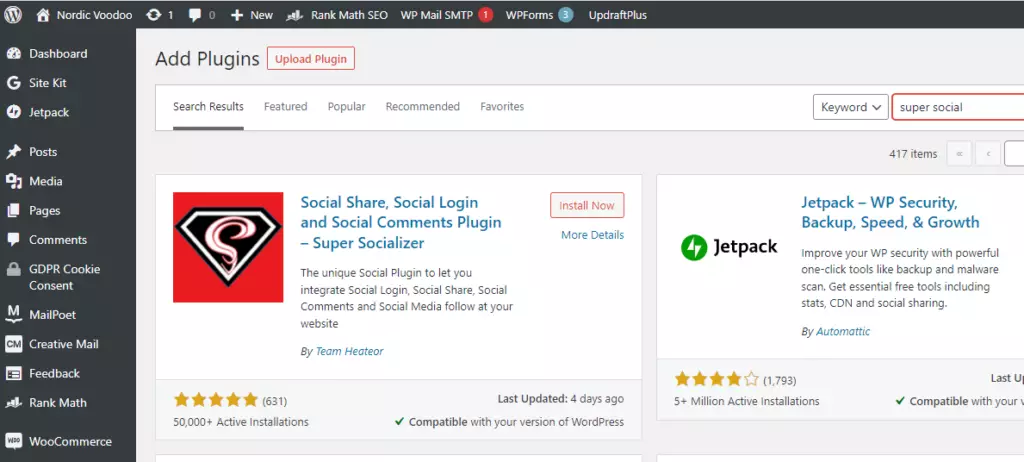
- Navigate to your WordPress dashboard’s Plugins area and select Add New.
- Look up Super Socializer. Install and enable the plugin.
Activate the Social Login Feature
After you install and activate the plugin, Super Socializer appears in the left sidebar of your website’s admin panel. Before you can enable social login button in your website, you must first activate it.
Let’s have a look at how you might be able to make it work..

- Navigate to the Super Socializer and choose Social Logins.
- Turn on social logins and save adjustments.
Adding Your Favorite Social Media Login
You may manage the kind and amount of social network that people can register with on your website under the plugin’s basic setup settings.
Enable a few items from the list, and then link your website to all the social accounts you want your visitors to be able to log in with using the social media login buttons.
There are a few additional options here, such as the Application ID and Application Secret Key, which you may investigate further. The question mark icons will take you to the step-by-step instructions.
Let’s use Google login as an example this time. So, let’s select Google from a selection of social accounts and talk about how you may use it as a social login on your website by integrating the google login button.
Link Your WordPress Website to Google
You’ll need Google Client ID and Google Client Secret to connect the plugin to Google, as indicated below.
To obtain these credentials, you must first create a project in Google Developers Console. Then, based on the information you enter into the project, you may generate a Client ID and Client Secret.
Creating the Project
- Open the Google Developers Console and start a new project.
- Name your project, specify its location, and then click Create.
- Navigate to the APIs and services menu and choose the Oauth consent screen.
- Fill in the blanks with information such as the application name, support email, and website address, among other things.
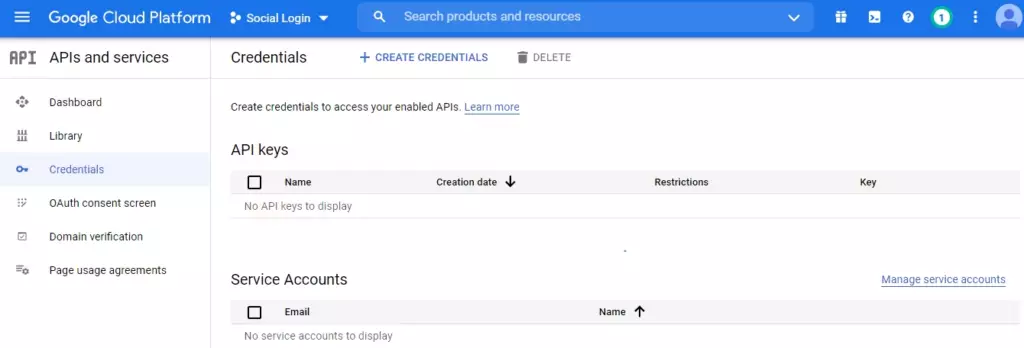
You may now create the necessary credentials after completing the project setup.
Obtaining Required Credentials
- Navigate to the APIs and services settings and select the Create Credentials button.
- In the Create Credentials section, click the Oauth Client ID link.
- You will be sent to the Create Oauth Client ID page.
- After entering the application type, click the Create button. A pop-up window will appear with your credentials.
- In the WordPress dashboard, copy and paste your Client ID and Client Secret to link your website to Google.
- Save your modifications.
Inserting Social Login Buttons Where You Want Them
The Social Login and Social Share capabilities can be activated on your website at any time.
The buttons, for example, are frequently put on your login form. You may, however, include them in the registration form, comment form, WooCommerce social login form, and a variety of other locations.
- Navigate to the advanced configurations section of the plugin settings.
- After that, you may choose where you want your social login buttons to display.
- After you’ve added your Google login to your website, click Save Changes.
Mark all of the spots where you want the login and sharing buttons to go.
The Google login option is now enabled on your website at the locations you choose, and your customers may log in using their Google account.
Conclusion
One of the kindest things you can do for your visitors is to include a Facebook login button and Google Login Button on your WordPress site. Apart from allowing people to connect to your site with a single click and maybe preventing them from leaving your site, it is also a terrific chance to get to know your audience better.
There are many plugins out there that will allow you to integrate social login feature to your site, you can try any plugin of the ones listed above, there is also Accesspress social login plugin. However, we advocate using the Nextend Social Login and Register plugin to effortlessly integrate the WordPress Social login options and get the marketing benefits.
If you don’t have a WordPress website Yet, make sure to follow our 8-Days WordPress Email Course. You should probably start by Selecting a Profitable Niche and feel free to ask anything in the comment section.


